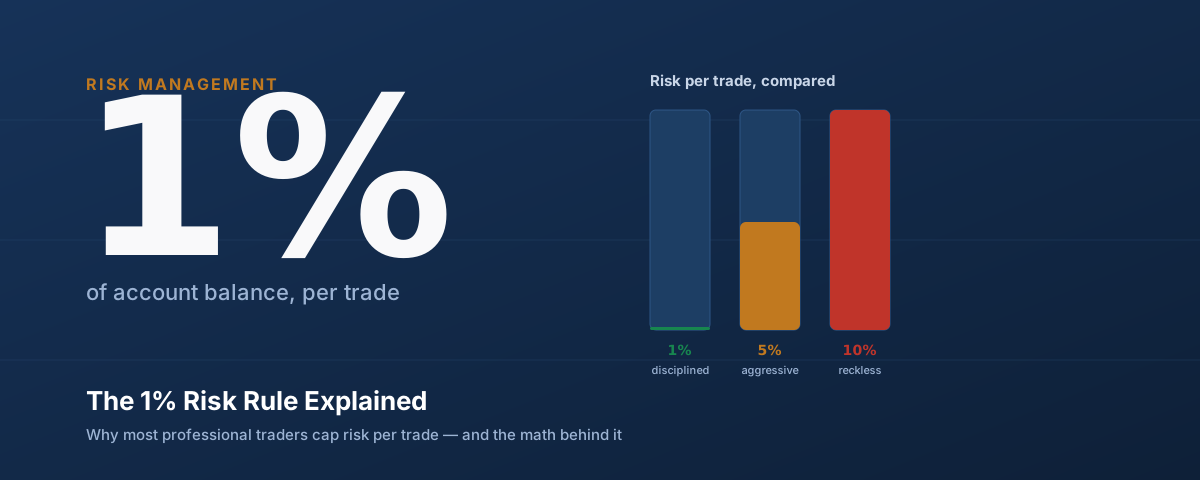
Somewhere in every trader's first year, they hear the "1% rule" — risk no more than 1% of your account on any single trade — and about half of them roll their eyes at it. One percent sounds tiny. It sounds like something a nervous, overly cautious person would do, not something that's going to build real account growth. Then that same trader has a rough month, checks their equity curve, and starts wondering why a strategy that "worked" on paper turned their account into a fraction of what it used to be.
The 1% rule isn't about being timid. It's about surviving long enough for your edge — if you actually have one — to play out over a large enough sample of trades. Here's what it actually means, why the math behind it is more dramatic than people expect, and when it's reasonable to deviate from it.
What the 1% rule actually says
The rule is simple to state: on any single trade, the total amount you stand to lose if your stop loss is hit should not exceed 1% of your current account balance. Not 1% of your original deposit — 1% of whatever your balance is right now. That distinction matters more than it sounds like it should, because it means your risk in dollar terms shrinks automatically during a losing streak and grows automatically as your account compounds upward.
It's not a rule about your stop-loss distance in pips, and it's not a rule about your lot size directly. It's a rule about the dollar outcome if you're wrong. The stop-loss placement and position size are just the two levers you adjust to make that dollar outcome land at 1%, which is exactly what a position size calculator is solving for every time you use one.
Why professionals actually follow it
The honest answer is survival, not conservatism for its own sake. Trading is a game of probabilities, and even a genuinely profitable strategy will string together five, eight, sometimes ten losing trades in a row purely from variance — that's not a flaw in the strategy, that's just how probability works over a long enough series of independent events. The question the 1% rule answers is: what happens to your account during that inevitable losing streak?
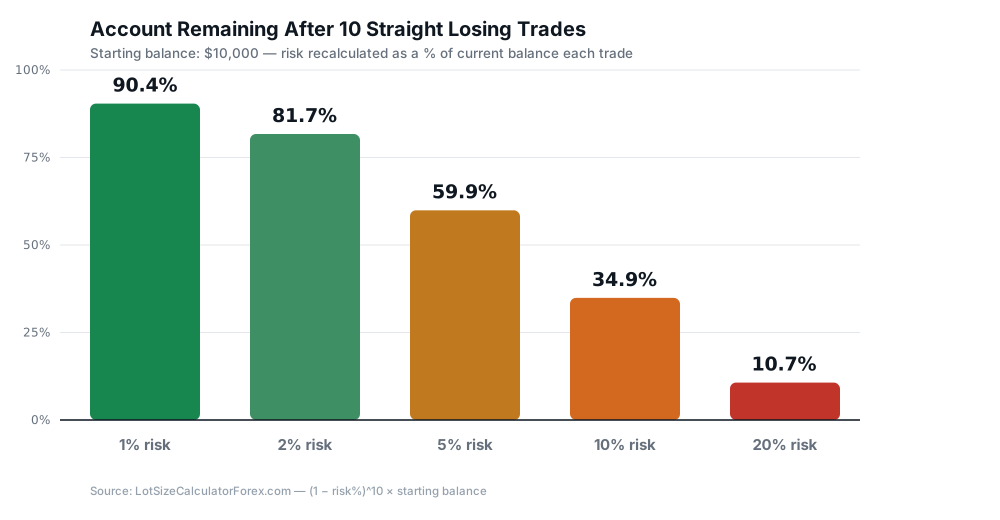
Ten straight losses is a realistic worst case for most strategies — not a black-swan event.
At 1% risk per trade, ten consecutive losses leaves you with 90.4% of your starting balance — a rough month, but nothing close to fatal. At 5% risk, the same losing streak leaves you with 59.9% of your account. At 10% risk, you're down to 34.9% — nearly two-thirds gone. At 20%, you're sitting on 10.7% of what you started with, functionally finished as a trader unless you're prepared to deposit fresh capital.
Nobody plans to hit ten losses in a row. But strategies don't ask permission before they go through a rough patch, and the traders who are still in the game five years later are, almost without exception, the ones whose position sizing meant a bad month was survivable rather than account-ending.
The recovery math that makes this non-negotiable
Here's the part that convinces most skeptics: losses and the gains needed to recover from them are not symmetrical. This is basic arithmetic, but it's counterintuitive enough that most new traders have never actually sat down and worked it out.
If your account drops 10%, you don't need a 10% gain to get back to even — you need 11.1%, because you're now gaining off a smaller base. That gap widens dramatically as the drawdown gets bigger.
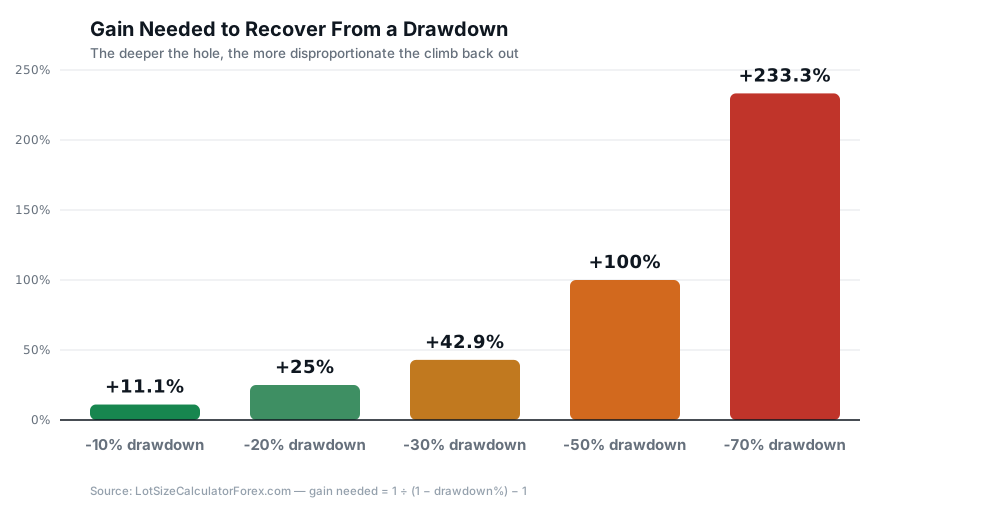
A 50% drawdown doesn't need a 50% gain to recover — it needs a 100% gain. A 70% drawdown needs +233%.
A 30% drawdown needs a 42.9% gain to recover. A 50% drawdown needs a full 100% gain — you have to double the remaining money just to get back to where you started. A 70% drawdown needs a 233% gain, which in practice means most traders who dig that hole never climb back out; they either quit or blow up the account entirely trying to force a recovery. The 1% rule exists specifically to keep you on the shallow, recoverable end of this curve instead of the deep end most traders never escape.
When 0.5% or 2% makes more sense than exactly 1%
The 1% figure is a well-tested default, not a law of physics. A few situations where it's reasonable to adjust:
- Drop to 0.5% if you're brand new and still validating whether your strategy has a real edge, if you're trading a prop-firm evaluation with strict daily drawdown limits, or if you're running multiple correlated trades at once (several USD pairs open simultaneously effectively multiplies your real risk beyond what any single trade's 1% suggests).
- Move up to 2% if you have a long, verified track record showing a real statistical edge, your strategy has a high win rate with well-controlled variance, and you've specifically stress-tested how your account handles a 10-to-15-trade losing streak at that risk level.
- Never risk more than 2–3% on a single trade as a matter of practice, regardless of how confident you feel about the setup. Confidence is not a risk management system — a chart pattern that looks obvious in hindsight fails constantly in real time, and the trades that "feel like a sure thing" are often exactly the ones that oversized positions get placed on.
Common ways traders quietly break their own rule
- Moving the stop loss after entry instead of accepting the loss. This silently turns a planned 1% risk into an unplanned 3% or 4% risk once price keeps moving against the widened stop.
- Averaging down into a losing position. Adding size to a trade that's already against you multiplies your original risk without ever explicitly deciding to.
- Forgetting correlated exposure. Three separate "1% risk" trades on EUR/USD, GBP/USD and AUD/USD aren't really three independent 1% risks if all three move together on a broad dollar swing — your real combined risk can be closer to 3% in a single direction.
- Recalculating position size off yesterday's balance. If your balance changed since your last trade, your risk amount in dollars needs to be recalculated too — 1% of $9,400 isn't the same dollar figure as 1% of $10,000.
Putting the number into an actual lot size
Knowing you want to risk 1% is only half the job — you still need to convert that percentage into an actual position size based on your specific entry and stop loss, which is a different calculation for every instrument and every trade (we covered the full manual formula in our previous guide on calculating forex position size). Rather than redo that math by hand every time, most traders just plug the numbers into a calculator built for exactly this.
Turn your 1% into an exact lot size
Enter your balance, set risk to 1%, add your entry and stop loss — get the precise position size instantly, for forex, gold, indices, crypto or stocks.
Open the Position Size Calculator →The 1% rule isn't glamorous, and it won't make anyone's next trade feel more exciting. What it actually does is make sure a bad month is just a bad month — a dip in the equity curve you recover from — instead of the reason your trading account doesn't exist anymore.